201 – Moving Data to the Cloud
This course assumes you are familiar with the basics of Apache Nifi – Read more here
Additionally, you can follow along using our Auto-Launching Nifi – Learn how here
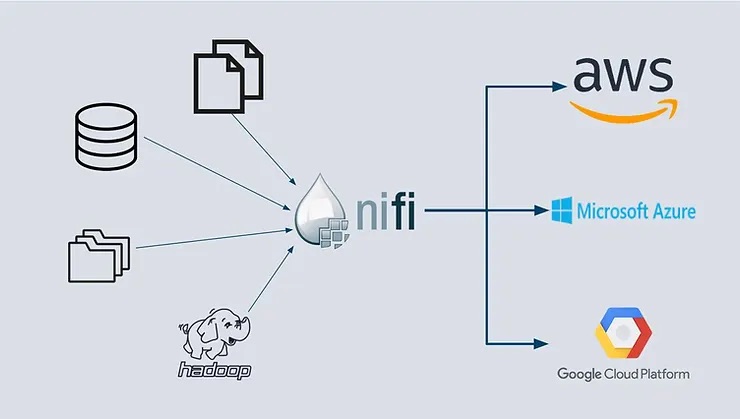
Moving data to the cloud is one of the cornerstones of any cloud migration. This series of training will establish common, reliable patterns to begin moving data.
Cloud Storage Options
There are many ways to store data on the cloud but the easiest typically are the object stores. All of the 3 major cloud providers have them:
-
Amazon – S3 Simple Storage Service
-
Azure – Blob Storage
-
Google – GCS Google Cloud Storage
These are an ideal starting point for files as typically you can just land the files without too much forethought or capacity planning. Additionally, these object stores often have insane durability in excess of 10 9s and 4 9s of up-time. This allows you to use them without fear of losing your data in all but the most demanding production uses.
For the purposes of this tutorial we will start with the most common object store, AWS’s S3 service.
AWS S3 Terminology
Before we get started moving data let us establish some basic terminology:
-
Bucket – A grouping of similar files that must have a unique name. These can be made publicly accessible and are often used to host static objects
-
Folder – Much like an operating system folder these exist within a bucket to enable organization
-
IAM – Identity and Access Management controls for making and controlling who and what can interact with your AWS
-
Access Keys – These are your access credentials to using AWS. These are not your typical username/password and are generated using access identity management
Creating an Access Key
For nifi to have permission to write to S3 we must set it up with an access key pair. There are many ways to do this but best practice would be to create a new IAM User. To get to the IAM User screen you can navigate there or click this link https://console.aws.amazon.com/iam/home#/users
-
Hit add user and check “Programmatic access”
-
Enter a new name such as “Nifi_demo”
-
Click “Next: Permissions”
-
Click “Create Group” and you will be presented with a list of permissions you can add to this new user.
-
Enter a group name such as “Nifi_Demo_Group”
-
Next to filter Policies search for S3 and check “AmazonS3FullAccess” and cick “Create Group”
-
At the bottom right press “Next:Tags” and Click through to “Next:Review”
-
Click “Create user” to finish making an IAM User
The Access key ID and Secret Access Key are very important to setting up your data transfer. You can download them as a CSV or save them somewhere safe. Be sure to record your Secret Access key as this is the only time it can be viewed
Creating your S3 Bucket
Now that we have credentials for AWS we need a place to land them. To put it simply, we need to create a new S3 bucket if you do not already have one. Go to this link https://s3.console.aws.amazon.com/s3/
-
Press “+ Create Bucket”
-
Enter a unique bucket name and note down the Region you are creating it in
-
You can click next and click through until the bucket is created the default options are fine.
-
Click on your new bucket and you should be able to see its contents, which are currently empty
You can follow along using our Auto-Launching Nifi – Learn how here
Setting up your Nifi + AWS Credential Service or Processor Controls
Nifi has many ways to provide access to AWS either through an overarching credential service or parameters set to a specific processor.
For an introduction to NiFi concepts check out our 101 course
The credential service is ideal for when you have multiple processors all relying on the same keys. For the scope of this tutorial, we will not be using that but it is ideal when moving into a production setting. Update: we now have a blog on controller services
-
To get started Click and drag in a new processor “PutS3Object” and right-click>configure the processor
-
Under the Settings Tab check the boxes next to failure & success as this is going to be the last processor in the flow
Under the properties tab configure the following properties:
-
Access Key ID – From the User you created earlier and noted down
-
Secret Access Key ID – From the User you created earlier and noted down
-
Bucket – Put the name of the bucket you created
-
Region – The region your bucket is in; often US East (N. Virginia)
Press apply to finish up configuring the processor

Setting Up your Flow
For the purposes of this sample flow lets replicate Nifi’s own configuration directory to S3. To accomplish this we need two additional processors, List files & Fetch Files. Connect them As shown below and configure them as:
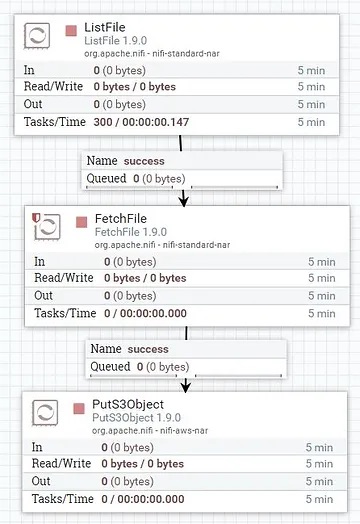
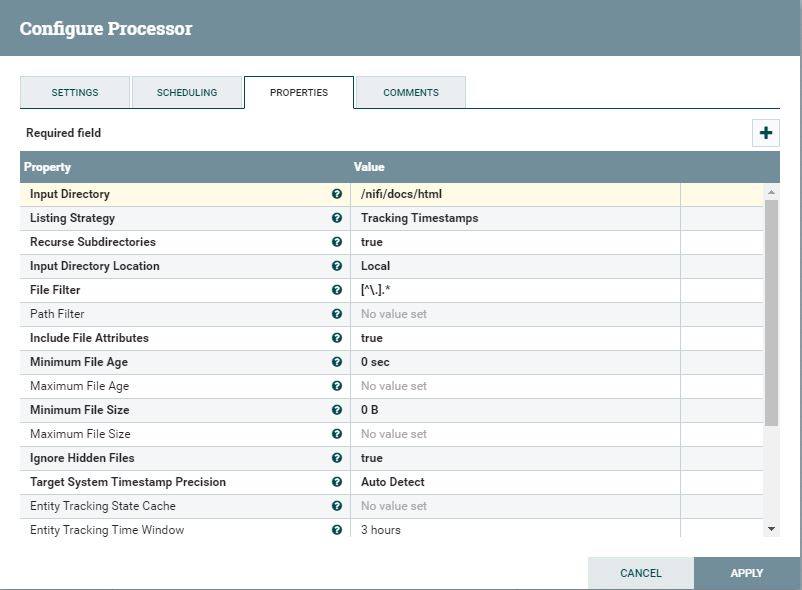
ListFile
-
Properties Tab – Set “Input Directory” to /nifi/docs/html
-
Drag a connection from ListFile to FetchFile for relationship Success
FetchFile
-
Settings Tab – Check the Boxes Next to “Failure”, “not.found”, * “permission.denied”
-
Drag a connection from FetchFile to PutS3Object For relationship Success
Running your Flow
-
Right click each of the processors and press “Start”
-
Let this run for a few seconds, if you want to track the progress right click into any blank space of your nifi canvas and press “refresh.” You should see each processor reporting flowfiles “in” and “out”
-
For the purposes of this demo you should probably right-click>stop list files. In production you can leave this task long running but itis always best to stop demos when done. This stops the demo from producing sample files after you stopped using the program.
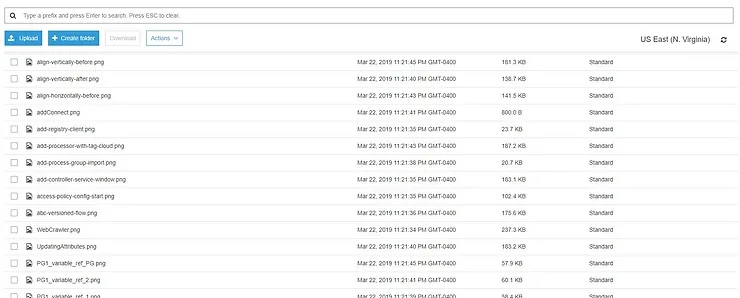
Viewing the Objects in S3
If you return to your bucket and look for files you should see them listed. Note: you may have to press the refresh button on the top right depending on your browser/settings.
[Optional] Security Cleanup
As an optional step you may wish to revoke the access keys you gave to this Nifi Demo. It is general best practice to remove unused keys when done.
To revoke the keys go here: https://console.aws.amazon.com/iam/home#/users
-
Left click on the user you created earlier in the tutorial
-
Go to the “security credentials” tab and look for the subsection “access keys” Here you can inactivate, delete, or even make new keys.
-
Make the key inactive or delete the key for best practices.
Next Steps:
Try Migrating Cloud Data for Yourself – Learn how here
Learn how to Stream Log Data to MySQL on AWS
